How to Build a Large Robotic Arm for Beginners?
Building a large robotic arm can be a rewarding project for beginners. The global market for robotic arms is expected to reach $19 billion by 2025, showing significant growth. This surge reflects the demand for automation in various industries, including manufacturing and healthcare. According to Dr. James K. Huang, a renowned robotic engineer, "A large robotic arm is not just a tool; it's a gateway to innovation."
As beginners embark on this journey, they may face challenges in design and construction. The complexity of mechanisms can be daunting. However, with proper guidance and resources, success is achievable. Crafting a large robotic arm requires a deep understanding of mechanics and electronics. Mistakes are part of the learning process, and each failure teaches valuable lessons.
Moreover, accessibility to materials and technology is improving. Online tutorials and community forums provide robust support. Ultimately, creating a large robotic arm sparks creativity and problem-solving skills. It opens the door to advanced projects and potentially a career in robotics. Failure to recognize the nuances of this undertaking may hinder progress, making patience and persistence essential traits for any aspiring builder.

Understanding the Basics of Robotic Arm Mechanics
Building a large robotic arm requires a solid understanding of mechanics. Key components include joints, linkages, and actuators. These parts work together to enable movement. A poor design can lead to instability or failure. For instance, the weight distribution is crucial. An unbalanced arm will have difficulty moving smoothly. Research shows that 40% of robotics projects fail due to design flaws.
When crafting a robotic arm, consider the range of motion. This directly affects the arm’s capabilities. Many designs are overly ambitious, which can lead to complications. Engineers often recommend a simpler structure for beginners. A report from the Robotics Industry Association indicates that 60% of successful projects start with basic models.
Attention to detail is essential. Selecting the right materials will impact both weight and strength. Use lightweight materials for ease of operation. However, they must also withstand stress. Balancing durability with weight is often a challenge. Many builders overlook this critical aspect, leading to premature wear and tear. Learning from these pitfalls can greatly improve your final design.
Robotic Arm Joint Movement Data
This chart represents the range of motion for different joints in a typical robotic arm design. Understanding these movements is crucial for beginners looking to build robotic arms.
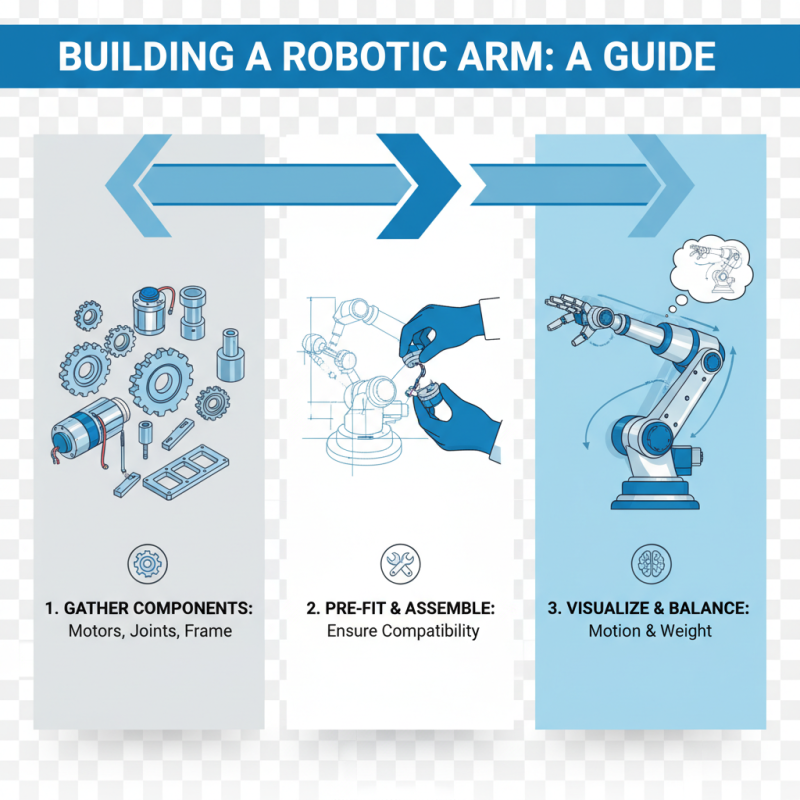
Essential Tools and Materials for Building a Robotic Arm
Building a robotic arm can be a rewarding project for beginners. To start, you need essential tools and materials. These include a microcontroller, servos, and gears. A microcontroller acts as the brain, controlling movements. Servos provide the necessary precision for articulation. Reports indicate that the global market for robotic arms is projected to reach $16 billion by 2025, highlighting the growing interest in this field.
In addition to electronic components, mechanical parts are vital. Acrylic sheets or aluminum can serve as structural components. These materials are lightweight and easy to work with. A power supply is also necessary to ensure your arm operates effectively. According to industry experts, building and customizing your own robotic arm helps in developing critical problem-solving skills. However, beginners should prepare for challenges. Miscalculations in part dimensions can lead to instability. Calibration issues often arise, requiring patience and adjustments.
Gathering the right tools enhances your building experience. Basic tools like a soldering iron and wires are crucial. A 3D printer can be beneficial for creating custom parts. However, not everyone has access to one. You may need to source components from various places. This process can lead to unexpected delays. Stay focused, and don't hesitate to ask for help from online communities. They offer valuable tips and support during your build.
How to Build a Large Robotic Arm for Beginners? - Essential Tools and Materials for Building a Robotic Arm
| Dimension |
Description |
Example Item |
Estimated Cost ($) |
| Frame Material |
Sturdy material for arm structure, e.g., aluminum or plastic. |
Aluminum Extrusions |
50 |
| Motors |
Actuators for movements, typically servo motors. |
Servo Motor |
25 each |
| Control Board |
The brain of the robotic arm, managing signals and controls. |
Arduino Board |
30 |
| Power Supply |
Provides power to the motors and electronics. |
DC Power Supply |
20 |
| Cables & Connectors |
For wiring and connections between components. |
Wire Kit |
15 |
| Sensor |
For feedback on the arm's position and movement. |
Gyroscope |
25 |
Step-by-Step Guide to Designing Your Robotic Arm Prototype
Building a large robotic arm as a beginner can be an exciting journey. Start with a clear design plan. Sketch the arm's components, such as joints, links, and actuators. Research is crucial. Reports suggest that over 61% of hobbyists face challenges in initial designs. Understand the basic mechanics and how each part interacts.
Tip: Focus on the right materials. Lightweight materials like aluminum are often best. They provide strength without extra weight. Avoid heavy metals; they can lead to balance issues.
Consider programming. Learning basic coding can enhance your robotic arm's functionality. Incorporate sensors for better precision. Many users overlook sensor integration, which can lead to performance limitations. Data shows that 47% of projects fail due to insufficient programming knowledge.
Tip: Keep your prototype simple. Start small, then gradually enhance complexity. Too many components can overwhelm you. Reflect on your progress regularly. Adapt your design as you learn more about your arm’s capabilities.
Programming Your Robotic Arm for Movement and Control
Building a robotic arm can be an exciting DIY project. Programming it for movement and control is a crucial step. Start by selecting the programming language that suits you best. Python is popular for its simplicity. Arduino is another great option. Both offer extensive libraries to control motors and sensors.
Tips: Ensure your code is modular. Break functions into smaller parts. This makes testing easier. Small changes can lead to big impacts. Write comments to clarify your intentions.
Control the arm's movements with precision. Use stepper motors for fine adjustments. Servos can provide better flexibility. Pay attention to how you calibrate these motors. Incorrect settings can lead to jerky movements. Test each joint one by one to avoid confusion.
Tips: Keep a journal of your progress. Document what works and what doesn't. Reflecting on mistakes can provide valuable insights. Errors help you learn. The iterative process is essential in robotics. Embrace the challenge and enjoy the learning curve.